Showing posts with label DIY. Show all posts

Tuesday, July 16, 2013

Questions & Answers about Polymer Clay

It seems like I have been working with polymer clay FOREVER!
I get questions all the time asking me about selling on-line, taking product photos and creating with polymer clay.

The other day I asked my fans on facebook if anyone had any questions for me about polymer clay.

Here are the questions I received...

Q - "What are the must have starter tools?"

A brick of clay and your imagination.  ;)  My first large polymer clay project was making daisy flower magnets for my wedding favors 15years ago.  I used white and yellow clay, a toothpick for the lines in the peddles and an old cookie sheet to bake them on.  Over years I have accumulated alot of tools.  My favorite tools are my pasta machine, a stick tool (it's pointy at one end), a long tissue blade (helps scrape off clay pieces from my tile), an exacto knife and a large ceramic tile (purchased at home depot...I glued felt to the bottom of it so it will not scratch my table). 
Q -  "Do you shape them by hand or is the special shape cutters you use?"

Most of my items are shaped by hand.  When creating all of my objects, I do look at each component as a shape though.  Kemper tools are my favorite cutters. 
 All of those objects above turned into these below...
Q - "My 13 year old step daughter is wanting to learn how to make figures. She can do a lollipop..lol.. Is there a book or a site to help her learn more?"

YAY!!  Love to hear kids want to learn to make figures.  I recommend Youtube!  There are some amazing polymer clay tutorials on youtube.  Type in polymer clay tutorial, you will get tons.  (you can also search gum paste) When I started I purchased clay craft books in the clay isle...that was pre-youtube.   

Q - "About how much does it cost to start up? And can you use standard ovens? I don't think I'd ever attempt the clay creations that you make because yours are exceptional but it does make me curious."

I guess cost depends on what you want to make.  To make one item all in one color it can be pretty inexpensive.  A brick of clay is anywhere from $1.00-$3.50ea.  Tools can be anything, as long as you are not using them for food again.  Toothpicks and needles make wonderful tools.  While you can purchase a toaster oven, polymer clay is completely safe to cure in your own oven (follow manufacture's directions on packaging).  When you bake your items you can use a cookie sheet from the dollar store.  You should try your hand at it, make some Christmas ornaments with the kids.  That is how I started many many years ago.  

Q - "What kind of glaze do you use and what is your favorite kind of clay to use?"

I do not glaze my pieces.  I am more of a natural girl.   My favorite clay to use is Fimo Soft.  

Q - "Where can you buy the tiny shapes,I.e. stars and hearts. I've looked but they are all too big

The tiny cutters are called Kemper Klay Kutters.  I have purchased my kemper tools from lots of different vendors over the years.  My first set was a gift from my sister and she purchased them from a local art supply store called Hyatts many many years ago.  The last set(s) I purchased by googling kemper tool cutters.  I don't have a one go to shop to purchase them.  

Q - "How do you not leave fingerprints?"

Honestly, there are fingerprints all over my items.  :D  I never found it an issue though.  I know some clay artists will use gloves or do other special things to remove them.  

Q - "Do you use any special tool to smash the clay?, so when you use a cutter it is all the same high. TIA

I personally use my hands & a pasta machine to condition my clay.  To make everything the same thickness I use the pasta machine.  You can also use a deck of cards and a rolling tool.

I hope this information sheds light into how I work with polymer clay.   If you have questions, comments, or feedback, feel free to leave them in the comment section below and I'll respond to them in my next question and answer blog post. 

My Signature

Thursday, May 23, 2013

Polymer Clay Dog Tag Tutorial

I meant to write this tutorial last year, but got distracted.  Not a shock.  Oooohhh  look something shiny.  ;)

Items I used:
Square Cookie Cutter
Letter Stamps
Stamp Pad (I used black)
Polymer Clay in desired color.
First condition your clay (smoosh and warm it up) and then roll out your clay to the desired thickness.  I use my pasta machine to do this.  If you do not have one a brayer tool works great.
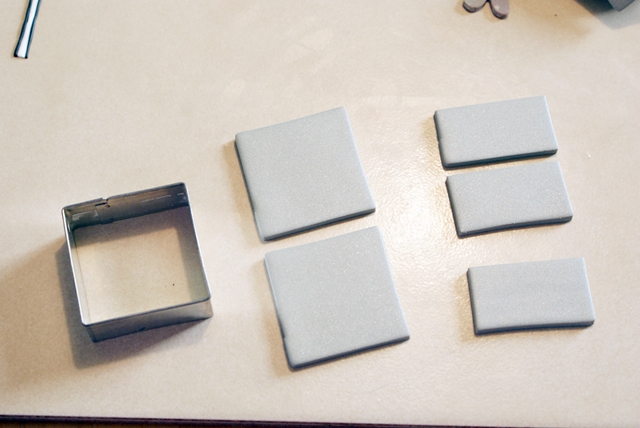
Then cut out a square with the cookie cutter.  I then cut the squares in 1/2.  You could also cut the rectangles by just cutting along a straight edge with an exacto knife.
I then rounded the edges a bit with my fingers.
And added a small hole to the one end.
Then I used my mini letter stamps and the black stamp pad to stamp sayings into the clay. 
The sayings are endless.  :)
You can also add some embellishments.  Then bake them following the instructions on the polymer clay packaging. 


I turned one into a necklace by adding a pearl accent and chain.
One of my customers (Little Bow Peep Boutique) uses them on her bows.
You could also add them to a photo frame with your favorite soldier's photo inside, key chain or scrapbook. 

Linking to these parties, here.
Today's Creative Blog
My Signature

Monday, March 18, 2013

Love is all you need...

I shared my new print addition to my wall yesterday.  Wanna know how I made it? 
I purchased the All you need is LOVE chalkboard picture as a jpg file is from Canvas Shoppe.  It is $5.00 and it comes with instructions on how to print it.
Now here is the tricky part.

I do NOT have a Staples here in Buffalo.

First tried to pay and have it printed by uploading it to office max & office dept and then go and pick it up.  FAIL.  Does not work, do not try it.  After finally uploading it to one, paying and then getting a call an hour later from my local store saying that they can not fulfill my order because they do not have a printer large enough...and then having to call another number to get a refund...total pain in the butt. 
I decided to finally get off my butt and take a drive over to my local Fed Ex store (used to be kinkos) and talk to someone there.  I wish I would have done it earlier.  It would have saved me a lot of time and energy.  They not only could print it, they printed it while I waited and a 24" x 36" one was under $5.00ea.  I bought 2.  One for me and one for a present for my friend.  (They will tell you that it will be pixelated...it's ok)

I purchased the huge foam core board at Michaels.  I had to ask the framing ppl for a larger piece than they had on their sales floor.
I used spray adhesive to attach the poster to the foam board.  I sprayed the foam board outside and brought it inside to lay the poster on top.  (I was going to use a brayer tool to smooth out the bubbles, but found it leaves marks so I ended up just using my hands.)
I let the glue dry overnight.  I used an exacto knife and ruler to cut off all the white.
I gave one to my friend and then I made myself one.

I hung it to the wall using the command strips for picture hanging. 


Linking to these parties, here.
Today's Creative Blog image 


My Signature

Sunday, March 17, 2013

Before & After....

See the picture up on the wall on the left?
It's above Lily in the picture below.
I got that picture many many years ago (I think it's from Home Interiors) and was feeling I needed a change....
I took it down, moved over the white frames and added this new print.  I am liking it much better.  :)

Jeff isn't sold, he hates change and doesn't really like anything on the walls.  Oh well, can't please everyone.   ;)

I purchased something last Sunday for the other side of  window, but it's not here yet. 

Sharing tomorrow how I created this print.  :)

My Signature

Thursday, March 14, 2013

St. Patrick's Day Wreath

I found this pin on pinterest the other day and decided to make something similar yesterday.  I am not sure who made the original wreath....looks like someone culled the images.  :(

Onto the supplies.

I already had the wreath form.  I had purchased it from the dollar store a while ago for a different project.  
I went to my local Joannes to grab some yarn.  I found this 'glitter eyelash' yarn (by Martha Stewart) on clearance for $2.97 a skein.  I choose this one because it has a sparkle all through it.  Sparkle makes everything better.  ;)
I purchased 4 skeins not knowing how many I needed for the project.  The yarn itself is pretty thin.  I ended up only using a little under 2 skeins.
I bought a 1/2 yd of the daisy embellishments with a 40% off coupon.  (I could have purchased a spool of it, but I didn't want that many daisies.)

To make the wreath, you just wrap and wrap and wrap the yard around the wreath form.  I wrapped the yarn in the ball before doing this.  While it takes some time to do first, I found it made it easier to wrap the form.  (Take that from someone who is usually lazy when it comes to things like that....)

While wrapping (which takes a while) I just kept thinking, this would be a cute St. Patrick's Day wreath. ;) 
 Then a lightbulb moment....my St. Patrick's pins would look cute stuck in it. 
I had already put my Easter pins in the terrarium and this is a perfect place for the St. Pat's ones. 
Now I need to add some ribbon and hang it.  :)

After Sunday, I am going to take out the St. Patrick's Pins and pin the daisies all over it to make it springy. 

{That's if I can get the wreath back from Lily...shortly after making it she asked me to take out the pins because she wanted to play with it....between wearing it as crown and using it for her ponies, I may never get it back...glad I have supplies to make a second.}

Linking to these parties, here.
Today's Creative Blog image

My Signature

Monday, February 4, 2013

Tinkerbell Bag

When Lily grows out of clothes, I usually pass them on to a friend.

Some of her clothes with cute designs I hang onto and give them to my mom to 'make something' out of them.  Most of the time my mom makes bags. Lily loves bags.  (You can see some other bags she has made in the past here.)
This bag was perfect for our trip.  I placed items that Lily would like to do on the plane.  (a few coloring books, colored pencils & crayons)  I placed it next to her on the plane for easy reach. 
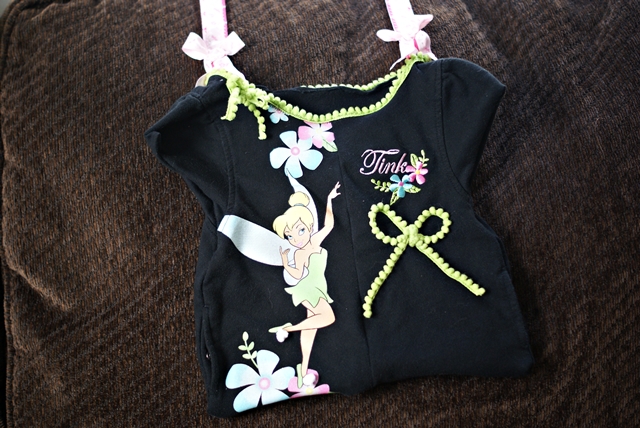
To make this bag, my mom used one of Lily's old hooded sweatshirts.
My mom removed the zipper from the front and put the 2 sides together.  She also removed the sleeves and sewed them up.
She left the pockets and then added a snap.  She also added lots of pompom fringe.  She even added some pompom fringe to Tink's shoes.
She used a couple different ribbons to make the shoulder strap (putting a fusable web in between them to make them stiffer).  And then she added this cute bow the end of each side.
 Linking to these parties, here.
Today's Creative Blog image
My Signature
Blog Widget by LinkWithin