Showing posts with label tutorial. Show all posts

Thursday, May 23, 2013

Polymer Clay Dog Tag Tutorial

I meant to write this tutorial last year, but got distracted.  Not a shock.  Oooohhh  look something shiny.  ;)

Items I used:
Square Cookie Cutter
Letter Stamps
Stamp Pad (I used black)
Polymer Clay in desired color.
First condition your clay (smoosh and warm it up) and then roll out your clay to the desired thickness.  I use my pasta machine to do this.  If you do not have one a brayer tool works great.
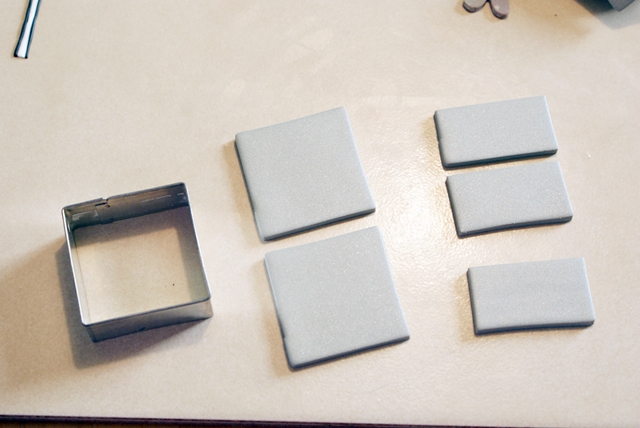
Then cut out a square with the cookie cutter.  I then cut the squares in 1/2.  You could also cut the rectangles by just cutting along a straight edge with an exacto knife.
I then rounded the edges a bit with my fingers.
And added a small hole to the one end.
Then I used my mini letter stamps and the black stamp pad to stamp sayings into the clay. 
The sayings are endless.  :)
You can also add some embellishments.  Then bake them following the instructions on the polymer clay packaging. 


I turned one into a necklace by adding a pearl accent and chain.
One of my customers (Little Bow Peep Boutique) uses them on her bows.
You could also add them to a photo frame with your favorite soldier's photo inside, key chain or scrapbook. 

Linking to these parties, here.
Today's Creative Blog
My Signature

Monday, January 7, 2013

Lego Figure Display

While looking around Pinterest awhile ago I found this idea to display Lego Figures.  Gotta love Pinterest.  When we went to Disney over the summer, I bought some single 2x4 bricks with the intention of making one for Ian. Fast forward a few months and I finally made it 2 days before Christmas.  It was super easy and didn't take that long.

For this project I used...
11x14 Frame (purchased at AC Moore)
E6000
ruler
30 Lego Bricks (I used 2x4 pieces, you could use smaller 2x4 ones, too)
Poster Paper (dollar store)


I first played around with placement and asked Ian what he thought.  I also had him bring down a couple figures he wanted to display on it. 
Ian only wanted 3 lines of single bricks and 1 long one along the bottom.  He was excited he could display his bigger special pieces along with the others.
Once I figured out where I wanted the pieces I glued the legos with E6000 directly to the glass.  I glued the legos directly to the glass instead of the poster paper, because I thought it would stand up over time better.  I knew Ian will be taking the figures off once in a while and didn't want him ripping the paper.  I also glued the long piece together first before I glued it to the glass.  Then I cut a piece of poster board down to size (using the mat that was provided as a template) to place behind the glass. 

Ian is very happy he can display his special Lego Figures now. 

Linking to these parties, here.
Today's Creative Blog

My Signature

Tuesday, December 7, 2010

Reindeer Tutorial

I have been wanting to do another tutorial for a while.

Here is how to make this cute little reindeer photo holder.


You will need:
Wire (I use 20 guage)
Chocolate Brown Clay
Black Clay
Red Clay
White Clay (for eyes, you can also use seed beads or marker or just black clay for these, too)
I use liquid clay between all of the joints for a better bond, but it is not necessary.

LOL, I noticed after I baked him that one of the hoofs lines were not in the front.  Oops.

**Please note this tutorial is for personal use.  If you make it & blog about it, I would love the linky love.**


I entered 6 ornaments and they picked the ornament pictured here to be in the running to become this weeks winner in the Better Homes and Gardens Ornament Contest!  Please go and vote for me.  You can vote daily.  =)


I am linking to these fabulous parties, here.
and here...
Get Your Craft On Tuesdayhandmade projects
My Signature

Monday, March 22, 2010

Chick Photo Holder Tutorial

Here is how I make my Chick Photo Holder.


Once your chick is baked, add eyes with an extra fine tip sharpie marker.


**Please note this tutorial is for personal use.  If you make it & blog about it, I would love the linky love.**

I have linked up to these parties...
giveawaysimageShow and Tell GreenThe DIY Show OffDIY Day @ ASPTLI Made It Blog PartyThe Girl CreativeMakingGet your craft on Thurs.BWS tips buttonCreations by Kara


My Signature
Blog Widget by LinkWithin